Last month, I watched a mom nearly cry when she saw her daughter’s reaction to the balloon arch we created together for her 7th birthday. She’d been worried the community hall would look too plain. After two hours of working together, we transformed that bare wall into a stunning coral and gold masterpiece. Her daughter squealed, “It’s like a real princess party!” That moment reminded me why I love teaching this skill to people.
Whether you’re an event planner building your portfolio or a parent looking to create something unforgettable, a DIY balloon arch provides that wow factor that everyone remembers. The best part? It’s far more achievable than most people think. You don’t need special training or expensive equipment. In this guide, I’ll walk you through everything you need to know, from choosing supplies to final installation.
A balloon arch does more than just decorate a space. It creates an instant focal point that draws people in and sets the tone for your entire celebration. Think about the last birthday party you attended. Where did everyone take photos? Probably wherever the best backdrop was.
A balloon arch gives your guests that picture-perfect spot they’re looking for. Whether positioned at the entrance to welcome guests, behind the dessert table, or as a photo booth backdrop, it becomes the natural gathering point for memories. The three-dimensional quality catches light beautifully, creating depth that flat decorations simply can’t match.
The versatility is unmatched, too. Planning a dinosaur party for a 4-year-old? Go with jungle greens and earthy browns. Celebrating a sweet sixteen? Try elegant rose gold and white. The same technique works for every age group and theme imaginable. At KDecor, we’ve seen countless event planners and DIY enthusiasts transform ordinary venues into extraordinary spaces using these exact methods.
Getting the right supplies makes all the difference between a frustrating afternoon and a smooth creation process. Here’s your essential shopping list.
Balloon Supplies
For a standard 6 to 8-foot arch, plan on 80 to 120 balloons total. This might sound like a lot, but it’s the quantity that creates that full, luxurious look you’re after.
Mix three sizes for the best results:
Choose your colours carefully. Three to five colours in the same family create cohesion without looking chaotic. I recommend picking one main colour, one or two complementary shades, and perhaps a metallic accent.
Quality matters, especially in Canada’s varying climate. Stick with reputable brands from Michaels, Party City, or order quality latex balloons online. Cheap balloons pop easily and deflate quickly.
Structural Materials
Your arch needs a backbone. Balloon decorating strip is the secret weapon that makes assembly incredibly simple. This plastic strip with evenly spaced holes lets you thread balloon knots through quickly. One 16-foot strip typically handles a standard arch.
You’ll also need:
Don’t skip the balloon pump. Your lungs will thank you after the first twenty balloons. Electric pumps run $20 to $40 and cut your inflation time in half.
Optional Finishing Touches
Consider adding faux greenery like eucalyptus stems, silk flowers, or tulle ribbons to elevate the look from party balloons to professional installation. These elements help fill unexpected gaps and add that extra polish.
This proven method works whether you’re a complete beginner or have made a few arches before. Take your time with each step, and you’ll have professional results.
Step 1: Plan Your Design and Measure Your Space
Before inflating a single balloon, know where your arch will live. Measure the space carefully. Standard arches work well at 6 to 8 feet wide and 7 to 8 feet tall, but adjust based on your venue.
Sketch your vision, even if it’s just a rough doodle. Classic rainbow arches follow the ROY G BIV colour order in a smooth curve. Organic arches have an asymmetric, flowing shape with clusters of balloons in varying sizes. Modern minimalist arches might use just two bold colours in a clean arrangement.
Here’s a time-saving tip: pre-inflate about a quarter of your balloons the night before and store them in large garbage bags. This breaks up the work and prevents hand fatigue on party day.
Step 2: Inflate Your Balloons
Here’s what surprises most people: you don’t need helium for a balloon arch. Air-filled balloons actually last longer, stay fuller, and cost a fraction of helium-filled ones.
Start inflating your balloons, varying the sizes intentionally. Not every balloon should be perfectly round and identical. Some should be inflated to full size, others to about 80%, and your small accent balloons to just 60% of their maximum capacity. This variation creates that organic, professional look.
Group your balloons by colour as you inflate. This makes assembly so much faster. The biggest rookie mistake? Overinflating. When you squeeze a properly inflated balloon, it should have a tiny bit of give. Overinflated balloons are more likely to pop, especially when you’re handling dozens during assembly.
Step 3: Attach Balloons to Your Strip
Now the fun begins. Take your balloon decorating strip and start threading balloon knots through the holes. The holes are designed to grip the knot and hold the balloon securely.
Work in 2 to 3-foot sections rather than trying to fill the entire strip at once. Alternate your balloon sizes and colours as you go. A pattern I love is large, small, medium, large, small, medium. This creates natural rhythm and flow.
Don’t worry about perfection at this stage. You’ll adjust and fill gaps later. Some balloons will stick out at odd angles, and that’s completely normal. As you build your arch, step back every few minutes to check your progress from a distance. What looks messy up close often looks great from where guests will actually see it.
Step 4: Install at Your Venue
Installation strategy depends on your arch type. For wall-mounted arches, place Command hooks at the top corners where your arch will hang and a few along the path for support. Hang your balloon strip on the hooks, adjusting the curve until it looks right.
For freestanding arches, set up your stand or frame first. Most balloon arch stands have a base you fill with water or sand for stability. Thread your balloon strip through the frame or secure it with zip ties at key points.
Test stability before walking away. Give the arch a gentle shake. Does it wobble? Add more weight to the base or additional support points. Outdoor arches in Canada need extra attention. Even a light breeze can topple an insufficiently secured arch.
Step 5: Add Finishing Details
Your arch is up, but it’s not finished yet. Walk around your arch and identify any gaps or thin spots where you can see through to the wall or the balloon strip showing.
Grab those smaller balloons you inflated and use glue dots to attach them over gaps. Press the glue dot onto the balloon, then press that balloon against another balloon in your arch. They’ll stick together, creating layers and fullness.
Add your non-balloon elements now. Tuck greenery stems between balloons, letting leaves peek out naturally. Wire silk flowers onto the balloon strip at focal points. Step back and fluff. Gently rotate balloons that are facing awkward directions.

The same basic technique creates completely different looks depending on your colour and style choices.
Rainbow Arch for Kids
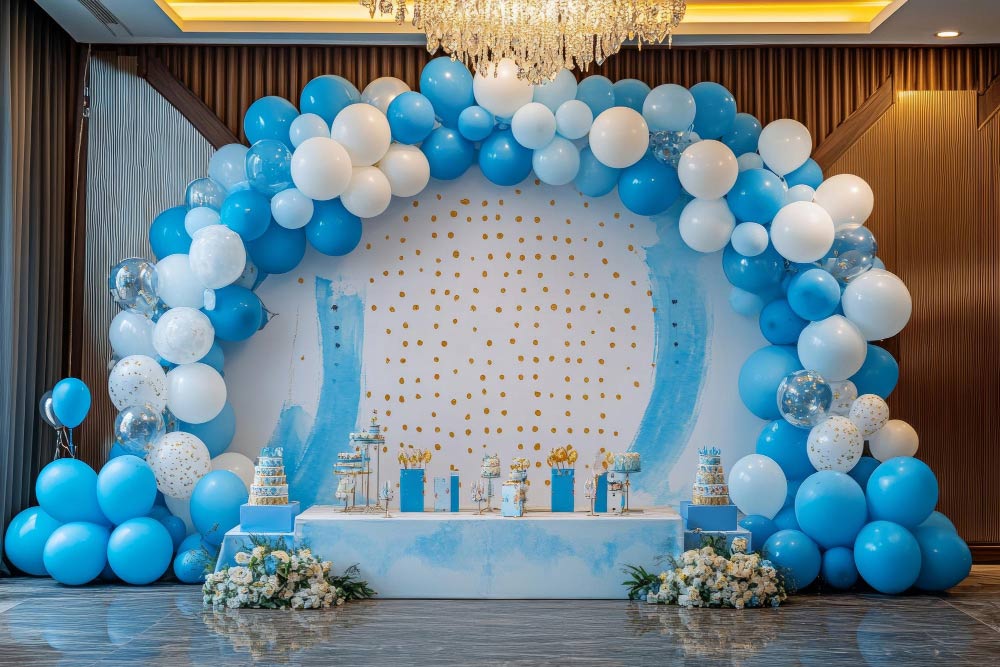
Nothing delights children quite like a rainbow. Follow the traditional ROY G BIV sequence: red, orange, yellow, green, blue, indigo, violet. Make it extra special by adding white or silver cloud-shaped balloons clustered at the base of each end. This works for any age from first birthdays to elementary school parties.
Elegant Monochromatic for Milestones
Celebrating a 30th, 40th, or 50th birthday calls for sophistication. Choose a monochromatic palette like all white, cream, and champagne with gold metallic accents. The key to making monochromatic arches interesting is using different finishes. Mix matte latex balloons with shiny metallic ones. Add clear balloons with confetti inside.
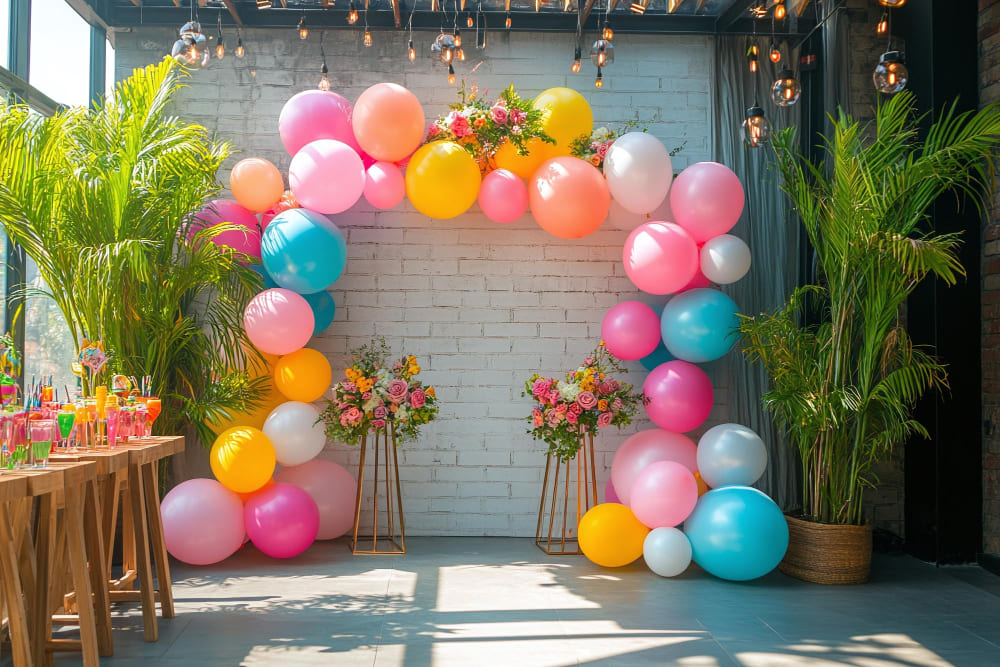
Pastel Organic Style
Soft, romantic pastels are having a major moment. Combine blush pink, sage green, cream, and terracotta for an earthy, boho vibe. This palette works beautifully for outdoor garden parties or spring birthdays. The organic style pairs perfectly with pastels. Create an asymmetric shape with balloons clustered heavily on one side and tapering to just a few on the other.
Bold Two-Tone Modern
Sometimes simple is stunning. Choose two high-contrast colours and create a bold, graphic look. Navy and gold. Black and rose gold. Emerald green and white. Arrange these colours in blocks or sections rather than alternating them. This modern approach suits contemporary venues and adult parties.
A beautiful arch that deflates or falls apart mid-party is heartbreaking. Follow these tips to ensure your creation stays perfect.
The ideal setup time is the morning of your event, about 4 to 6 hours before guests arrive. This gives you a comfortable window to build and adjust without rushing, while balloons are still at peak fullness. Latex balloons maintain their best appearance for about 24 hours, so you can set up the night before if absolutely necessary.
Temperature is the biggest enemy. Keep your arch away from heaters, fireplaces, direct sunlight streaming through windows, and outdoor heat sources. In Canadian winters, be careful bringing balloons from a cold car into a warm venue. The rapid temperature change can cause popping.
Sharp edges are another hazard. Survey your installation area for anything that could catch balloons. Furniture corners, exposed nails, rough brick walls can all cause problems. Add padding or adjust placement to avoid these hazards.
Using only one balloon size creates a flat, two-dimensional look. Your arch needs depth and texture, which comes from size variation. Always mix at least two sizes, preferably three.
Overinflating balloons is tempting because bigger seems better. But overinflated balloons are stretched to their limit, making them fragile and prone to popping. Leave a bit of give when you squeeze them.
Poor colour combinations can sink an otherwise well-constructed arch. Before buying balloons in bulk, purchase one of each colour you’re considering and hold them together. Do they look harmonious?
Creating a stunning balloon arch is one of those skills that feels complicated until you’ve done it once. Then it clicks, and you realize it’s completely achievable. That community hall, backyard, or restaurant party room you were worried about can absolutely be transformed into something special.
Start with a simple design for your first arch. Choose an easy three-colour palette, plan for a classic curved shape, and give yourself plenty of time. Whether you’re planning events professionally or creating special moments for your loved ones, KDecor is here to support your creative journey with tips, inspiration, and practical guidance for every celebration.
Grab your supplies, put on some music, and start creating. Your venue transformation is just a few hours away.
For a standard 6 to 8-foot balloon arch, you'll need 80 to 120 balloons. Use a mix of sizes: mostly 11-inch balloons as your base, some 5-inch for filling gaps, and a few 16-inch as statement pieces. The size variation creates depth and a professional look.
No, you don't need helium for a balloon arch. Air-filled balloons actually work better because they last longer (up to several days vs. hours with helium), cost less, and are easier to work with. Use a balloon pump to save time and energy when inflating.
An air-filled balloon arch stays at peak appearance for 12 to 24 hours and can last up to 3 days before noticeably deflating. Set up your arch 4 to 6 hours before your event for the best look. Keep it away from heat, direct sunlight, and sharp objects to prevent popping.
A DIY balloon arch costs between $50 to $100 in materials, including balloons, balloon decorating strip, pump, and accessories. This is 80% cheaper than hiring a professional decorator in Canada, who typically charges $300 to $600 for the same size arch.

Zara Collins brings 6+ years of content writing expertise to every project, specializing in lifestyle and creative content that resonates with modern audiences. Her work focuses on creating authentic, reader-friendly content that performs well in search engines while building genuine connections with readers.